Scheduling Settings
What Is Scheduling?
Scheduling lets you create a public booking page where other people can schedule meetings with you based on your real availability. Instead of the back-and-forth of finding a time that works, you share a link and let people pick a slot directly from your open calendar.
It works similarly to tools like Calendly — but built right into SmarterMail.
Accessing Scheduling Settings
Click on Settings in the top bar.
Select Scheduling from the left-hand sidebar.
Configuring Your Scheduling Page
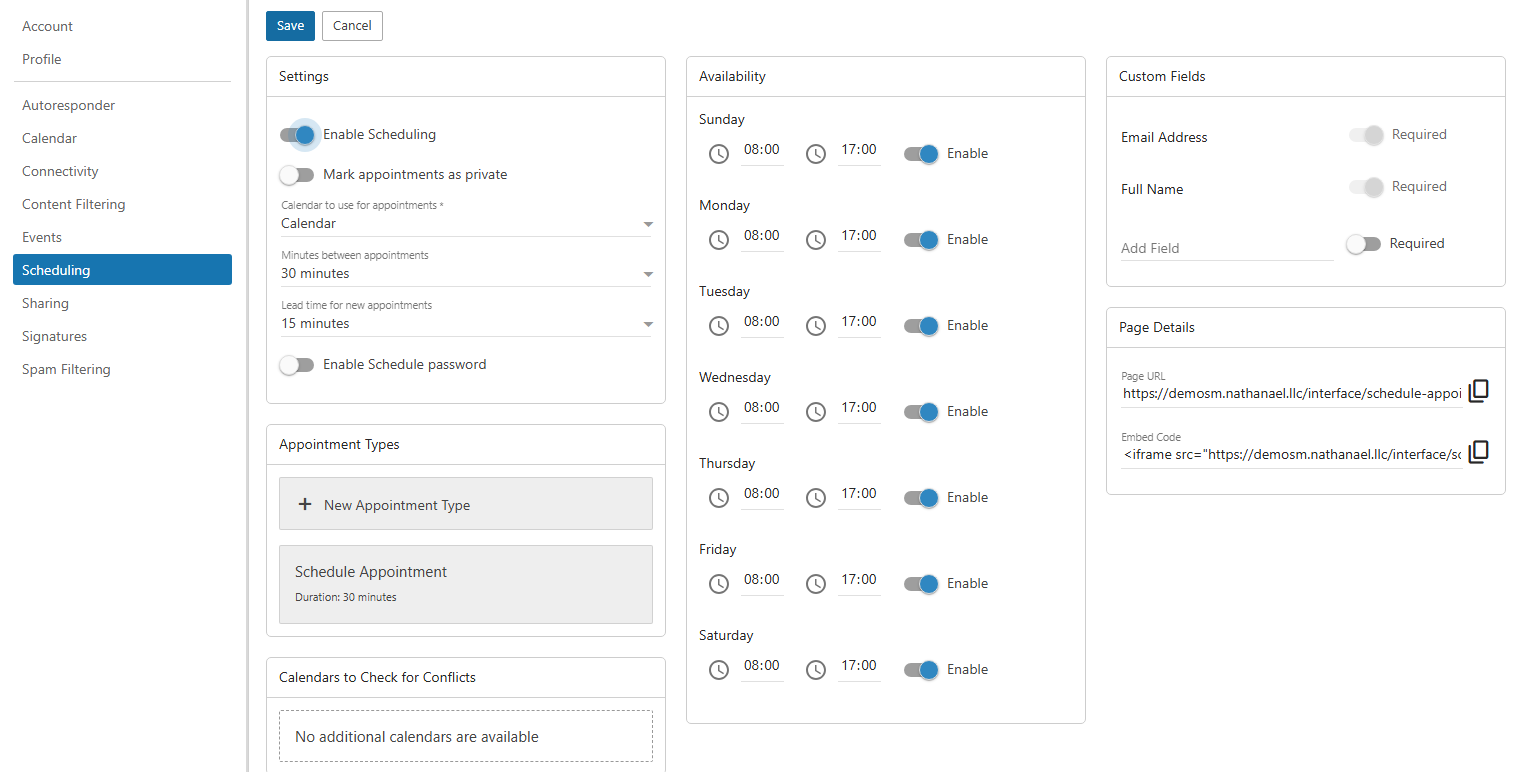
Calendar & Buffer Settings
Calendar Choose which of your calendars to use for appointments. SmarterMail will check this calendar for existing events to determine when you’re available.
Minutes Between Appointments Set a buffer gap between back-to-back bookings. For example, a 15-minute buffer gives you time to wrap up one meeting before the next one starts.
Lead Time for New Appointments The minimum amount of notice required before someone can book a slot. For example, a 24-hour lead time prevents people from booking a meeting for the same afternoon with no warning.
Availability
Define which days of the week you’re open for bookings and set your working hours for each day. Any time outside these windows will appear unavailable on your booking page.
This works independently of your calendar events — both must align for a slot to show as open. If a slot is within your availability hours but already blocked by a calendar event, it won’t be bookable.
Creating Appointment Types
Click New Appointment Type to define the kinds of meetings people can book with you. Each appointment type can have its own settings:
Duration Set how long this type of meeting lasts — for example, 15 minutes for a quick check-in or 60 minutes for a full consultation.
Name & Description Give the appointment type a clear name (e.g. “Discovery Call”, “Support Session”) and an optional description so bookers know what they’re signing up for.
Custom Fields Add fields to the booking form to collect information from the person booking. Common examples include Full Name, Email Address, company name, or a message field for them to describe what they want to discuss.
Once configured, click Save to publish the appointment type to your booking page.
Sharing Your Booking Page
After saving your settings, you have two ways to share your scheduling page:
Page URL Copy the direct link and share it in your email signature, on your website, or anywhere else. Anyone who visits the link can see your availability and book a slot.
Embed Code Copy the embed snippet to place your booking calendar directly on a webpage. This is useful if you want the scheduler to appear inline on a company or personal website without redirecting visitors to a separate page.
Note
Your booking page reflects real-time availability based on your calendar. Make sure your calendar is kept up to date — if you have an unblocked gap but are actually unavailable, someone could book it.